
Surveying Compass is a branch of surveying that involves determining the position of points by measuring the directions of survey lines using a magnetic compass and the lengths of those lines using a chain or tape. This method is particularly useful for surveying large, undulating areas with many details and obstacles, where chain or triangulation methods alone are impractical.
In compass surveying, a traverse is conducted by establishing a series of connected lines across the survey area. Chain surveying is frequently the method of choice for surveyors working on small-scale projects that require a high degree of precision.
Before opting for a compass survey, it’s crucial to assess the area for potential magnetic disturbances. These disturbances can significantly affect the accuracy of compass readings, potentially compromising the entire survey. Factors such as nearby metal deposits, power lines, or other sources of electromagnetic interference must be taken into account.
The choice between compass and chain surveying ultimately depends on the project’s specific requirements, including:
- Size of the area to be surveyed
- Desired level of accuracy
- Terrain characteristics
- Presence of magnetic disturbances
- Time and resource constraints
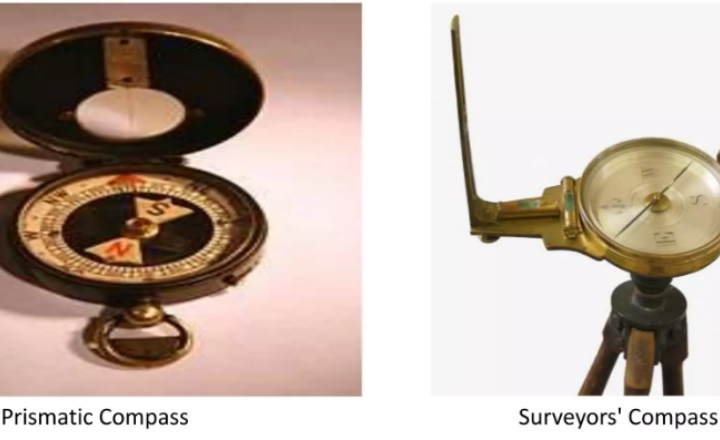
Types of Surveying Compass
Surveying compasses are of the following two types :
1. Prismatic Compass
2. Surveyor’s Compass
Prismatic Compass
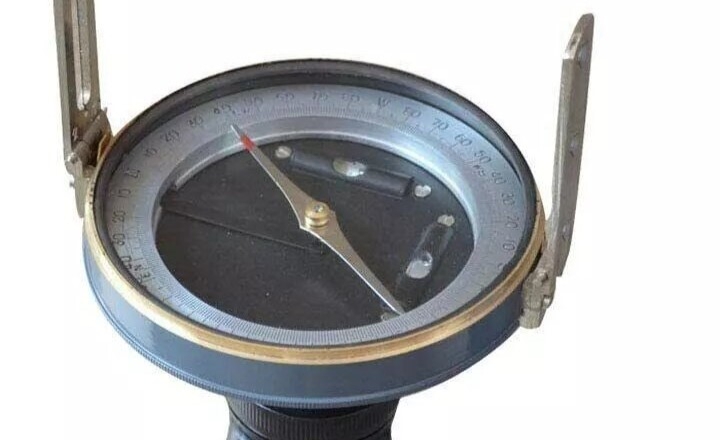
The prismatic compass stands out as a premier surveying tool, renowned for its versatility and accuracy. Typically housed in a circular enclosure measuring approximately 100 mm in diameter, this instrument offers the flexibility of handheld operation or tripod mounting, ensuring precise positioning over ground station markers.

- It is a portable magnetic compass often housed in a circular box about 100 mm in diameter.
- It can be used handheld or mounted on a tripod.
- Has a prism that allows simultaneous sighting and reading without changing position.
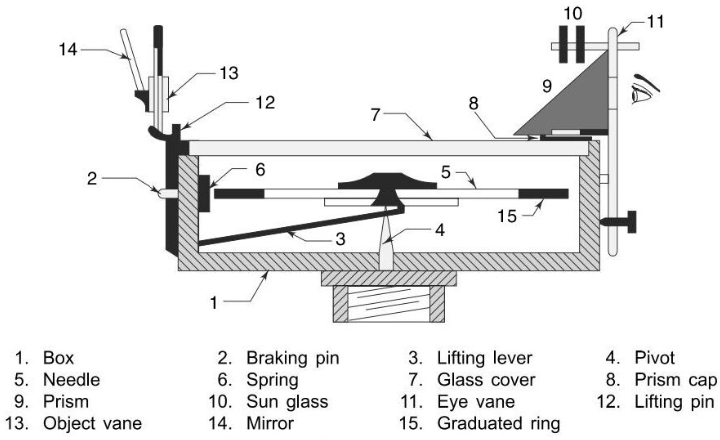
- Major parts include a magnetic needle, graduated ring, adjustable mirror, sliding arrangement for the mirror, object vane, eye vane, metal box, and glass cover.
- It provides accurate readings by the prism focusing mechanism and is versatile for various surveying tasks.
Key Components and Design of Prismatic Compass
- Compass Box: The main body is shaped like a round container about 100 mm wide. It protects all the important internal parts and keeps them stable during use. It also shields the compass from dust and dirt.
- Magnetic Needle: A thin, flat magnet attached to a light aluminum ring. It freely pivots on a sharp central point called the pivot and always points to the magnetic north, helping measure bearings.
- Graduated Ring: A circular scale attached to the magnetic needle made of aluminum, marked from 0° to 360° to represent directions. The numbers are printed backward but appear correct when viewed through the prism.
- Pivot: A sharp point at the center that supports the magnetic needle and the ring, allowing them to spin freely for accurate readings.
- Object Vane: A sight on one side of the compass box that has a thin vertical line or hair to line up with the object you want to sight. Some compasses have a tilt mirror here for viewing high or low targets.
- Eye Vane (Sight Vane): Located opposite the object vane, it has a slit to look through, like aiming a gun. Attached here is the prism, which helps in reading the bearing and the numbered ring simultaneously.
- Prism: A triangular glass prism that bends light, enabling you to see the graduated ring’s numbers clearly while sighting an object. It also makes the backward numbers appear normal and enlarged for easy reading.
- Glass Cover: A clear lid on top of the compass box protects the delicate parts inside from dust and moisture.
- Lifting Mechanism: When the object vane is closed, it pushes a small lever that lifts the magnetic needle off the pivot, preventing damage when not in use.
- Brake Pin: A small pin to stop the needle from swinging excessively, helping get stable readings.
- Sun Glass (Dark Glass): Tinted glass used in bright sunlight conditions to reduce glare and improve sighting visibility.
Operational Principles of Prismatic Compass
When using a prismatic compass, you align your objective with the object vane by looking at it via the eye vane. The graded ring rotates with the compass box while the magnetic needle remains pointed north. The number on the ring that corresponds to the needle pointing north can be seen via the prism. This figure indicates your target’s bearing or direction.
Setting Up:
- Hold the compass steady in your hand or preferably mount it on a tripod for stability.
- If using a tripod, carefully center the compass directly over the exact survey station marked on the ground. This ensures a precise location for measurements.
- Level the compass using the tripod’s ball and socket arrangement so the graduated ring and needle swing freely without obstruction.
Preparing for Sighting:
- Open the object vane and eye vane so they stand upright and ready for sighting.
- If bright sunlight causes glare, lower the sunglasses (tinted glass) to reduce glare and improve visibility through the sights.
Taking a Sight:
- Look through the slit in the eye vane, which has an attached prism for simultaneous aiming and reading.
- Rotate the entire compass slowly until the vertical hair in the object vane aligns perfectly with the target or the ranging rod.
- Keep the compass as steady as possible to avoid inaccurate readings.
Reading the Bearing:
- While holding the sight on the target, look down through the prism to see the graduated ring’s bearing.
- The prism magnifies the numbers and corrects the backward-printed scale so you can clearly read the bearing aligned with the prism’s hairline.
Fine-tuning the Reading:
- If the magnetic needle swings excessively, gently press the brake pin to stop its movement and stabilize the reading.
- For improved accuracy, take several bearings and average the results.
Special Situations:
- For targets that are higher or lower than your eye level, use the adjustable mirror on the object vane.
- Tilt the mirror to bring such targets into view without moving the compass base.
Recording and Moving On:
- Note down the magnetic bearing from the prism reading.
- Also, record the reverse bearing by adding or subtracting 180° for navigational consistency.
Closing Up:
- Close the object and eye vanes carefully.
- This action triggers the lifting mechanism that raises the magnetic needle off the pivot, protecting these delicate parts during transport.
Surveyor Compass
The Surveyor’s Compass, as its name suggests, has been widely used in surveying work. Although it has been largely replaced by the more compact and handy prismatic compass, understanding its construction and operation remains valuable. Here’s a detailed description of the Surveyor’s Compass.
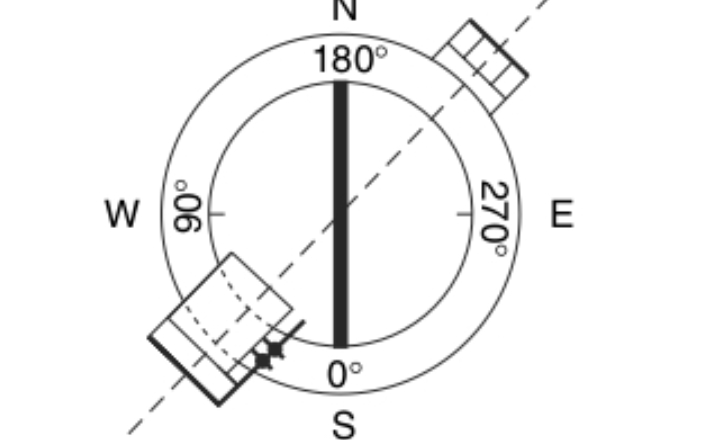
- This compass has a circular brass box with a magnetic needle freely swinging over a graduated brass circle divided into 360 degrees.
- It uses a pair of sights (eye and object vanes) for aligning with the target.
- The circle is graduated using a quadrantal system with 0° at North and South and 90° at East and West.
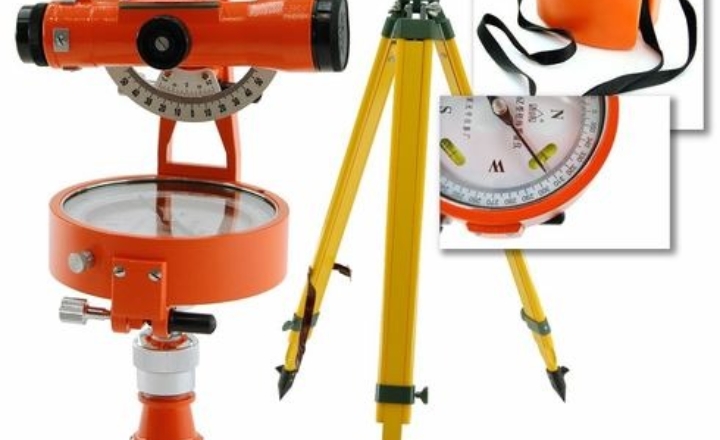
- It generally requires mounting on a tripod for stability and leveling.
- It was widely used historically, but is now largely replaced by the prismatic compass.
- Its graduated circle rotates with the box while the needle points north.
- Used for measuring horizontal angles and magnetic bearings
Construction and Key Components:
- Compass Box: A circular container that houses the main components. Unlike the prismatic compass, the graduated ring is directly attached to this box and rotates with it.
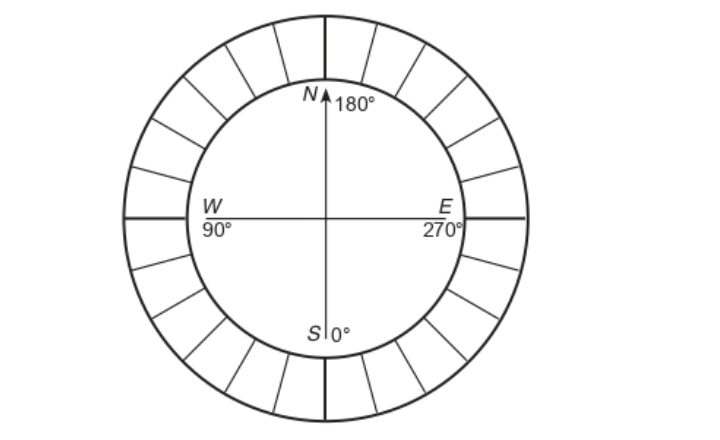
- Graduated Ring: Attached directly to the compass box, it is marked with cardinal directions and degree measurements using the quadrant bearing system (0° to 90° in each quadrant), unlike the whole circle system in prismatic compasses.
- Magnetic Needle: An edge bar type needle that floats freely over the pivot and acts as the index. It is not attached to the graduated ring, allowing independent movement of the needle.
- Pivot and Jewel Bearing: These support the magnetic needle and enable smooth, frictionless rotation for accurate readings.
- Sight Vanes:
- Eye Vane: A simple metal vane with a fine sight hole or slit for aligning the line of sight. It does not have a prism.
- Object Vane: Used to align with the target; it is a plain metal vane without a mirror, unlike prismatic compasses that often have a tilted mirror for sighting high or low targets.
- Glass Top: Protects the internal parts while allowing visibility of the needle and graduated ring.
- Lifting Mechanism: Includes a lifting lever and pin to protect and preserve the needle and pivot when the compass is not in use by lifting the needle off its pivot.
Graduation System and Reading:
- Quadrantal System: The ring is graduated in a quadrantal system, with 0° marked at both North and South ends, and 90° at East and West ends.
- Reversed East-West Markings: The east and west markings are interchanged from their normal positions to facilitate reading bearings in the proper quadrant.
- Reading Against North End: Bearings are read against the north end of the needle, unlike in some prismatic compasses, where readings are taken from the south end.
Operation and Use:
- Setting Up: The compass is positioned over the survey point.
- Sighting: The surveyor looks through the eye vane’s sight hole and aligns the object vane with the target.
- Reading: As the compass box is turned, the graduated circle moves, but the needle continues to point north. The bearing is read where the north end of the needle points on the graduated circle.
- Quadrant Identification: The reversed E-W markings help in correctly identifying the quadrant of the bearing (NE, SE, SW, NW).
Difference Between Prismatic Compass and Surveyor Compass
| Feature | Prismatic Compass | Surveyor’s Compass |
|---|---|---|
| Construction | The graduated ring (scale) is attached to the magnetic needle and rotates with it. | The graduated ring is attached to the box and rotates with the compass body. |
| Bearing System | Uses the Whole Circle Bearing (W.C.B) system from 0° to 360°. | Uses the Quadrantal Bearing (Q.B.) system, ranging from 0° to 90° in four quadrants. |
| Sight Vanes | Eye vane contains a prism for simultaneous sighting and reading. | Eye vane is a simple metal with a small slit, no prism. |
| Reading Method | Readings are taken through the prism while sighting the target, enabling simultaneous reading and sighting. | Reading is done through the top glass; one must sight first and then read separately. |
| Usage and Portability | It can be used handheld or mounted; more versatile in various conditions. | Generally requires a tripod for stable use, less versatile for handheld use. |
| Needle Type | A broad needle attached to the graduated ring. | The edge bar needle is floating freely on the pivot. |
| Graduations | Graduations are inverted/backward but corrected visually by the prism. | Graduations are erect but printed for quadrantal bearings. |
| Accuracy and Ease | More accurate due to prism and simultaneous sighting/reading. | More accurate due to the prism and simultaneous sighting/reading. |